Wednesday, April 18, 2012

Where does the money go?

In the comments on the StenoKnight blog post I mentioned in the previous article, Stan asked:

"Btw, if I were to start donating money to the project, where would it go? Like does it pay programmers? For more Majestouches and Sidewinders? Epoxy? Lol."

I replied:

"As of right now, Plover's raised $4,762. I've contributed $4,000, and 15 generous donors have contributed the $762. All of that money except $100 (which we received yesterday) has so far gone to Josh Lifton, Plover's first programmer, to try to reimburse him in some small degree for the enormous number of programming hours he's donated over the past two years. Hesky made the most recent code contribution, so I offered him yesterday's $100 donation, but he said he was happy to keep contributing code for free, and told me to keep the $100. I'll be using it to buy epoxy and foam mounting squares to stenoize the Sidewinders I'll be buying (most likely out of pocket) for the PyGotham steno class. I'll probably offer the Sidewinders for sale after the class to any students who feel like pursuing steno further, and any money I make from that will go back into the general fund, either to pay for programming or to build up a starter inventory of epoxy key kits to sell, which might go some way toward making Plover somewhat self-sustaining."

I figured it was a fair question to ask, and I just wanted to put the answer out there in a more prominent place, in case other people were interested. More information on how to contribute money, code, or other resources can be found on our Donation Page.

Tuesday, April 17, 2012

Video: Plover versus $4,000 Software

Just wanted to mirror the video I posted last night over on my StenoKnight CART Blog, in an entry called CART Problem Solving: Lag.


The top frame is Plover, of course, writing into Vim. The middle frame is my $4,000 proprietary software, Eclipse, and the bottom frame is pretty much Eclipse's only concession to my profession -- it's almost exclusively focused on the needs of court reporters rather than CART providers or captioners -- a utility called the "CART Window". It eliminates the horrible syntax markup you see in the Eclipse window itself, but as you can see the trade-off for that is a 1.5-second delay between when a stroke -- including a command stroke like "Enter" or "arrow key right" -- is written and when it appears on the screen. It's incredibly annoying. I'm not singling out Eclipse for ridicule, incidentally. It's the best of the proprietary crop by a fair margin. All the other software on the market is based on this timed buffer principle. Plover is the only steno software I know of that actually delivers instant text to the screen without the tiresome intermediary of a timed buffer. The importance of this is hard to articulate to people who don't know how long 1.5 seconds can feel when they're waiting for a computer to respond to their commands or when they're relying on the text to appear before they can pick up the thread of the conversation. This is one of my all-time favorite features of Plover, but it's hard to explain the difference to people who haven't had to work with a program like Eclipse. I hope this video makes it a bit clearer.

Monday, April 16, 2012

Plover for Windows is Updated!

Fantastic news!

Hesky has updated the Windows Port of Plover. It now support commands such as Escape, Backspace, Return, et cetera. This makes it much more useful to use as a replacement key entry system. I'm planning to use it as a monitoring system when I can't see my client's screen. For instance, I have a class tonight where the student likes to sit several feet away from me at a seminar table, while I sit near the back wall. Up until now, I've had to crane my neck and squint my eyes to read the words I was writing over her shoulder. My proprietary steno machine has dual outputs, which means that it can send the same steno signal to two separate Bluetooth recipients, but my commercial steno software won't allow me to run it on two computers at the same time, so even though I always carry both my laptop and my tablet PC with me, the other computer has been basically useless to me in this situation, unless I wanted to set up a StreamText job for myself, which would cost me $6 per hour. Last week I tried using the Windows version of Plover as a monitor to cut down on the eye strain, but because commands weren't yet implemented, Plover had to be restarted every time I sent a "new paragraph" command. Restarting Plover isn't that hard; you just click the red P on the task bar twice. But it was still kind of inconvenient. Now I'll be able to monitor output on my laptop while my client views the same output on my tablet, which is going to be really nice. I know that everyone using Plover for Windows applications will really enjoy this update too. This version is based off of the penultimate Linux version, so it still doesn't have correct number handling or any of the nice added features from Josh's last version (like the on/off toggle hotkey). Hesky's hoping to get to those in a week or two. This is still a really big improvement, though. Check it out!

http://stenoknight.com/plover/plover.exe

By the way, I wrote this entire blog post in Plover on the SideWinder pictured in the previous post, with the epoxy keys. It's really amazingly smooth and comfortable, and both my speed and accuracy are drastically improved over the non-altered SideWinder. I'm very pleased. I'll be ordering more SideWinders and making more epoxy keys over the next few weeks, and hopefully I'll have built up a decent-sized stable of them by the time PyGotham arrives, so that we'll be able to accommodate anyone who wants to learn steno hands-on.

Tuesday, April 10, 2012

Epoxy Keytopper Update


As you can see, I've been iterating the epoxy keytopper experiment, and I'm quite pleased with the progress we've had so far. I got some opaque resin dye to make the keys a bit more attractive. They're sort of a smoky gray color in this batch; I think I'll use more dye in the next batch to see if I can make them truly black. This batch of keys is also thicker and stiffer for some reason, whether because I didn't use enough hardener in my first batch (I sort of approximated the one-to-one ratio) or because I made sure to fill the wells all the way up to the top. I think it's an improvement, because while the keys are harder to cut down to size using scissors, they also don't flex and buckle the way the first batch did, making the overall feel a much more secure one. Because I didn't cut the keys down, though, I had to lift them up so their overlapping edges didn't accidentally press the keys in the row beneath them. I bought a couple of packets of foam mounting squares (usually used for scrapbooking) and stuck 'em on, two squares per key. It works fairly well, though as you can see my rows are not quite even, and there's precious little wiggle room between certain of the keys. I'll definitely have to come up with a more consistent method of sticking these things on. It's still too haphazard and time-consuming. Plus the adhesive on the mounting squares is definitely too weak to stand up to repeated off-center pressure from pressing on these keys. I think to be truly effective we'll probably have to put a small glob of superglue between each of the four layers. I think the company that was supposedly selling the silicone Sidewinder skin ripped me off; they charged my Paypal account, but I haven't seen any sign of the skin, and they're not answering my emails. ETA: They emailed me a day after I posted this, saying the skin was on back order. So hopefully it'll arrive eventually. Oh well. As you can see from the picture, I had to take the space bar off the machine because otherwise the vowel keys would hit it when they were pressed. (That unearthly red glow is made by the LED backlighting of the Sidewinder. I think I might cover the gap where the space bar used to be with black gaffer's tape, just 'cause it's a little creepy-looking.) So I think this method is going to require permanent conversion of Sidewinder into steno machine, which makes me less reluctant to use superglue. I'm happy to report that the feel is already drastically better -- the full-sized, uncut keys are much easier to work with, and the foam gives them a bit of a lift that's also pretty comfortable. I wrote a paragraph or two with Plover on this keyboard and it was drastically better than the first prototype I posted, which itself was quite a bit better than the undoctored keyboard. So I'm hopeful that this will be a good starter machine for the stenocurious at PyGotham, and if I can work out a reliable templating system (any ideas on that are very welcome!) in terms of how to position the keys easily and consistently, I think this would make a nice little kit that we could sell at a modest profit to benefit the Plover Project. The only real bottleneck is the 24-hour curing window between batches, since I still only have the one mold, but that's really not so bad. I think I'm on the right track.

Guest Post: Getting Started with Steno

This is an article written by Mau Bustamante, a steno autodidact who showed up on the Aviary a few months ago, to my great delight. He posted this over there a while ago, but I've been swamped, so I'm just now mirroring it here. It's really cool to see that the expensive steno school paradigm is not the only effective one out there. I knew that already when Stan Sakai picked up Plover on a whim, taught himself theory from a book, and and wound up eventually buying commercial steno software and hardware and becoming a professional CART provider. He's promised to write me a recap post on his learning experience too, but in the mean time, I'm really happy that we've got Mau's account, because he's much more the sort of audience Plover is aiming at. He doesn't intend to make steno his career, but he's happily using it in his daily work and recreational life, which makes me ridiculously excited. It's so cool seeing that it's already useful technology, even though Plover's still got a way to go (I'm still trying to get someone to finish up the Windows port, and I've got to do some tasks for Fly in order for Pragma to be able to finish the next version. Still no word on the dictionary conversion script. Josh says he's going to be working on the just-in-time dictionary entry feature soon, but he's got to get a break from his day job first. Open source development is like a glacier: Slow but relentless, and eventually unstoppable.) So enjoy Mau's post! If you've got any comments or questions, feel free to ask them here and I'll forward them along, or head over to the Aviary and ask him directly!

Getting started with steno - my experience
Mau Bustamante

Intro

I took up the Dvorak keyboard some five or six years ago and find it to be much more comfortable and enjoyable to use, though not necessarily any faster. Around the time I started reading about alternative keyboard layouts, I found out about the machines that court stenographers use to transcribe proceedings. However, the high cost of the hardware required to use this technology and the inability to type directly to the computer meant that it was out of the question for me. Some years later, I discovered Plover and tried out the in-browser demo.

Having the opportunity to try out this method of entry with a total investment of a nice gaming keyboard meant an immediate download and a new obsession.

The following narrative summarizes my learning process/approach to stenography right from day 1. It is provided for informative purposes; it is not the official method, or even a good method necessarily, and therefore it is not guaranteed to work for anyone. Read at your own risk.

The beginning

After reading some of the most recent Plover blog posts [1], I jumped straight into the learning phase. My initial approach was the same as what I used to learn Dvorak. I studied the key layout to understand how my hands are supposed to hit the keys. Keeping a picture of the lay out open in another window or writing it down for reference helps a lot to learn the location of the letters [2]. I typed the whole alphabet a few times before moving on [3]. The phonetic makeup of the chording system did take a little to get used to, but once you can wrap your head around this element, the rest kinda falls into place a lot faster.

I read all of the tutorials available [4]. The next step was to try out all the sample sentences and words that I could find. There are common sentences listed on the aviary and the wiki [5]. I tried to make mental notes on how the briefs are put together - most of them have some phonetic logic that is easy to remember...some of them don't at all, but that's just something that you have to deal with and since English is stupid like that too, I didn't mind all that much.

While I began to learn to put together the sounds, I took note of the fact that some keys used on their own represent endings such as "s" or "ing" - this is very useful because it is often possible to attach those endings at the same time as the rest of the word. I spent considerable time trying out all the endings [6]. In the same way that I learned the layout, I'd keep a notepad window open for typing on one side of the screen and the endings list on the other for ease of reference.

Intermission

I'd like to mention here that learning steno is not something that I restricted to my time on the computer. Learning steno is a day-long exercise... From time to time, I'll catch myself wondering how I can type a certain word or I'll try to follow along with the radio or television by tapping on a desk or something. It gets into your head kinda like the falling Tetris blocks that stay on your mind when you're trying to sleep after playing for two hours.

The continuation

Letters and sample sentences are all good and nice, but after a while, I felt like I should be typing other words that are not part of the lists. I faced three options: I could finger-spell everything, I could spell words phonetically, or I could learn the briefs.

I quickly found out that finger-spelling everything takes just about forever. Speed-wise, stroke for stroke, briefs are the clear winner, but I noticed that it takes a lot of time and mental effort to learn them well enough to recall with any sort of reliability.

With this in mind, I decided to work mostly on getting the hang of producing the individual sounds to build the words from their parts. Briefs moved to the bottom of my priority list. At this stage, I was beginning to get really excited about my progress. Speed was not very good, but it was satisfying to be able to guess how to type the words just by figuring out the component sounds. For those trickier words, I had to dig through the dictionary to find the right way of typing it. Knowing no good way to navigate the dictionary, I decided to harness the power of Microsoft Excel [Appendix A]. This worked out very well because I was able to type an entire sentence at once instead of having to look for the words individually. I've found that there are numerous entries in the default dictionary that are a result of stacking errors or misspellings so be careful about what definition you decide to adopt. Unfortunately, I don't have the experience to identify the best definitions to use with any real confidence. I just stick to one that makes sense in my mind and is comfortable to type. Making sense of the definitions you use is key to being able to recall them quickly. When I switched to Ubuntu, I started to use the grep command on the dictionary file, which meant going back to finding individual words. [Appendix B]

Next steps (wingflaps?)

At this point, I'm fairly satisfied with my progress. I'm able to do most of the operations that I normally do on the computer with Plover, but there are still some rough edges and aspects of it that keep me from switching completely. For instance, it would be great if the number pad or the numbers above the letters were usable. This way, I could use Excel without having to turn Plover off simply because steno in my opinion is just not suited for entering calculations such as 13557/4132*(546-45) efficiently.

[1] http://plover.stenoknight.com/
[2]http://stenoknight.com/plover/qwertytosteno.png
[3]http://stenoknight.com/stengrid.png
[4]http://plover.stenoknight.com/2010/06/steno-101-how-to-do-it.html
[5]http://stenoknight.com/wiki/Practice_Sentences_with_Common_English_Words
[6]http://stenoknight.com/wiki/Plover_Cheat_Sheet


The appendices are available here
http://www.eng.uwaterloo.ca/~mbustama/apps.doc
And my lookup file
http://www.eng.uwaterloo.ca/~mbustama/lookup.xlsx

Monday, March 26, 2012

Towards the Affordable Steno Machine

There's been a bit of a lull in the Plover Project lately. Sadly the person who was finishing the Windows Port had to back out because her new company is getting off the ground, and Josh has mapped out the basics of the just-in-time dictionary entry feature, but he's too busy with his day job to implement it just yet. I've been paying the bills with lots of CART work, but that's meant that I've been neglecting the audio version of Steno 101 (not to mention new chapters of it), canonical categorization of the Fly dictionary, and all the other tasks assigned to me. We're also waiting on several people who have pledged to take a crack at an automated rtf-to-json dictionary converter script, but nothing from any of them yet. And we haven't heard anything from the grant we applied for, but at this point it's looking relatively likely that we might not have gotten it, which is too bad. So in a way we're in the Plover doldrums at the moment. But in another way, I'm pretty hopeful. I've been invited to give a half-day lecture and workshop on Plover and steno at PyGotham this year. Last year I gave a 35-minute overview on all the things steno could do and how far along Plover was in helping people to do them, but this year I'm going to go into a bit more depth, focusing more on accessibility and coding in the brief lecture part of the program, and then spending the rest of the time helping people learn the basics of steno on their own computers.

In order to do that, we're going to need a steno machine for each person attending the workshop, and since it's just a taste of steno, we have to make it as low-commitment as possible to hook in as many people as might be even vaguely interested. It's looking promising that we won't have to charge an extra fee for participants, which means that either the conference or I or both of us together will have to pick up the cost of the steno machines. If we were to buy 10 new Stentura Proteges, the standard entry-level student steno machine, at sticker price, we'd have to shell out a cool $17,450. That's just not gonna happen, nor should it. We're not roping these people into a lifetime commitment to stenography as a profession. We're showing them the cool things it can do and encouraging them to fit it into their life as a hobby or as an ergonomic tool in their daily work life. Clearly we've got to get that $1,745 price tag way, way, way down. From its inception, Plover has been designed to work with any qwerty keyboard that offers n-key rollover. But the staggered columns and square keys of the typical qwerty layout are tricky to adapt to the parallel columns and vertical keys of the steno layout, especially for beginners. I can write steno on an undoctored qwerty keyboard fairly easily, though I do have to sacrifice a certain amount of speed and accuracy. But I've heard a lot of would-be Plover users tell me that it's just too tricky to wrap their minds around being able to press, for instance, the "W" key and the "S" key with the same finger at the same time. It feels alien to them. Initially I tried to solve the problem with the application of leather keypads designed for steno machines, but while they helped hint at the proper alignment, they didn't have enough stiffness to really compensate for the staggered nature of the qwerty layout.

Back in 2010 I posted an entry about Abigail's brilliant stenohack. She had an old junker manual steno machine that she'd gotten for cheap, and she scavenged it for its keys, then affixed them to her sidewinder with mounting foam. It worked well for her, but it wasn't easily replicable, because old steno machines can be hard to come by, and individual steno keys sell for $7 apiece (a minimum of $154 for a complete set!) online.

So I think I've finally found a low-cost kludge that could hopefully make a big, big difference. You remember last month when I bought the iStenopad overlay, to use with the free-as-in-beer steno software that's available for the iPad? It didn't work well at all. The silicone cells were too thin and too mushy to offer anything in the way of haptic feedback, and my fingers kept sliding around all over the place, making for dismal accuracy and a very frustrating experience. But I'd spent $45 on that thing, plus $10 shipping, and it irked me that it had just been a big waste of money. So after staring at it for a few weeks, an idea occurred to me -- since it's not useful as an overlay, could it be turned into a mold?


Mann Ease Release lubricant, EasyCast clear casting epoxy, drinking straws for pipetting, plastic cups for mixing, plastic swizzle sticks for stirring, and the iStenopad overlay-cum-mold

I bought some epoxy resin casting materials and some silicone mold lubricant at an art store and gave it a try.


The keys, freshly cast in the mold (left) and after being freed from the mold (right)

It was actually really easy. Five minutes to let the lubricant settle, five more for the mixing and pipetting process, 24 hours to cure, and bingo! A full set of lovely epoxy steno keys, at pennies a set; for $25, I got enough EasyCast to make 20 or 30 sets, with resin to spare.


The keys wound up being a little too long to fit easily on the machine, so I had to cut them down with scissors, which fortunately was pretty easy to do.

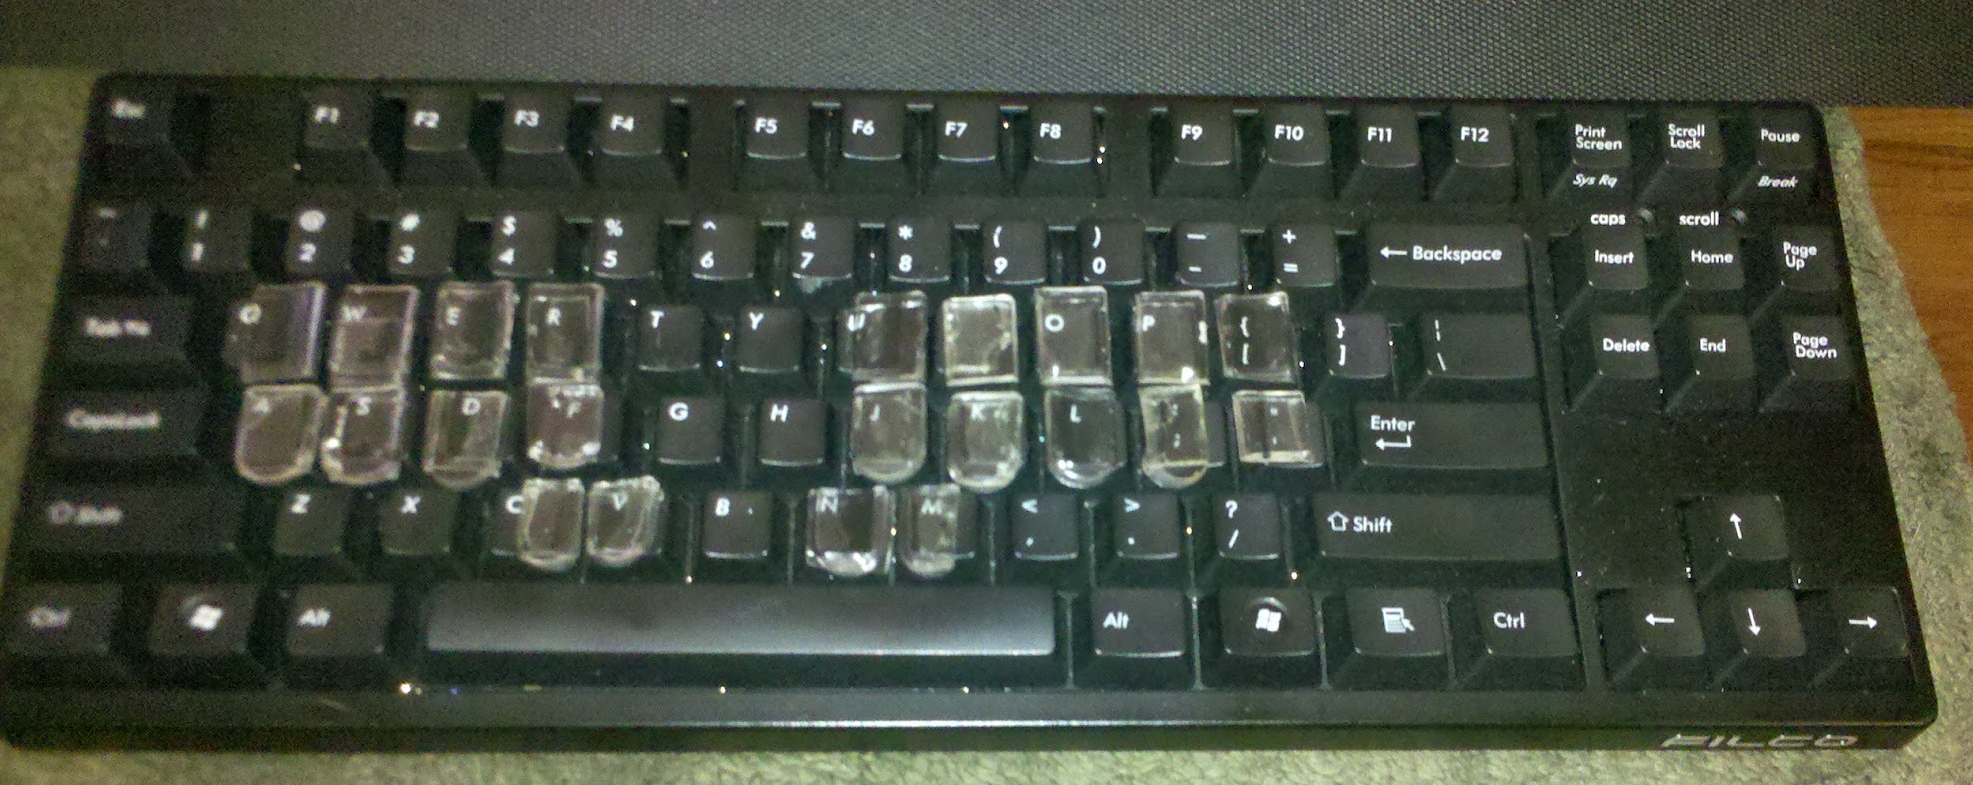
Here's what they look like on my Filco Majestouch Tenkeyless. Originally I tried sticking them on with heavy-duty mounting foam, but they all came off way too easily, so I got some U-Glu at the drugstore, which seems to be working a lot better. It also comes in pre-cut little squares, which makes the sticking-on process a lot less tedious. So how does the altered keyboard feel? I have to say it's not half bad. I transcribed about 20 minutes of audio using it on the train home, and there was a definite improvement of comfort and accuracy over the keyboard without the keytoppers. It was really nice to have the columns lined up properly, and I found myself making fewer misstrokes due to inadvertently dropping keys. It's still not as smooth or easy as on my $4,000 Infinity Ergonomic, of course, but it's really not half bad. One thing I'd like to do is to build up the lower row a bit so that it's at the same depth as the upper row, but I'm not really sure what I can use that's both of a consistent thickness and reliably sticky. The U-Glu has been pretty tenacious so far; no lost keys after a day of banging around in my backpack. It's far from attractive, but I'm hoping to find some black pigment to mix into the next few batches, so that I won't have to look through the key toppers and smudgy glue squares to the distorted qwerty key labels beneath.

Majestouches retail at around $120, though, so that's still not quite affordable for the workshop. I'm hoping to give everyone Microsoft Sidewinder X4s, which can be purchased for around $45 a pop. On the Majestouch, I stuck the keys on fairly haphazardly. You can see that they're uneven shapes and not quite lined up. It's tricky to get them close enough together so that there's not much of a gap between rows, but not so close together that they overlap and interfere with the separate action of each key. It was also the most tedious part of the process, and took much more time and energy than the actual casting of the keys. Ideally, I'd like to be able to sell these keys as a kit, including a printable paper template that can be used to help with cutting and positioning each key in a quick, foolproof way. I know that a lot of Plover users also like alternating between steno and qwerty, so just supergluing the steno keys to the keyboard would cut out half of the keyboard's functionality for them.
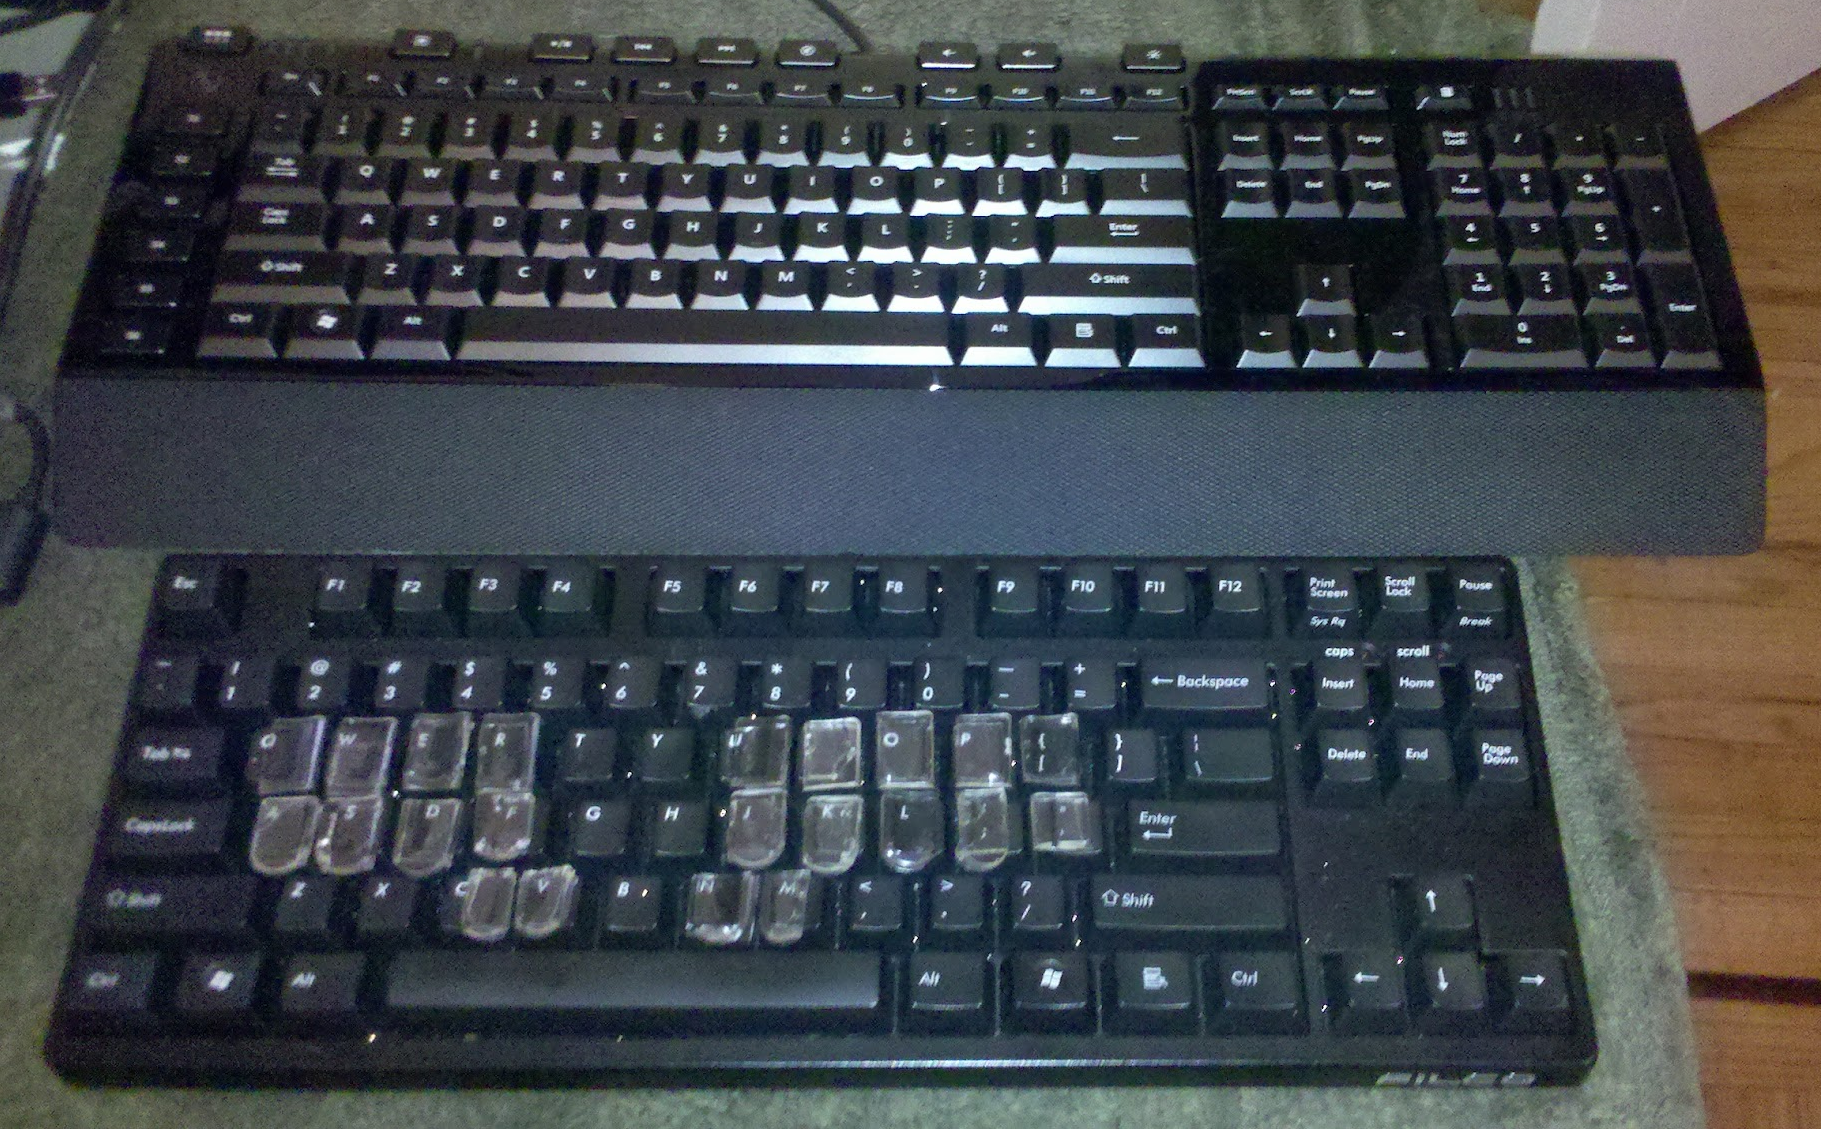


I figured a good solution both to the key positioning issue and to the reversability issue would be to glue the keys to a silicone keyboard skin rather than directly to the keyboard. I've ordered a skin that claims to be compatible with the Sidewinder X4. It hasn't arrived yet, so I don't know yet whether it'll actually fit. As you can see, the Sidewinder is a rather different size and shape from the Majestouch, so it'll definitely require more fiddling and tweaking to get the keys into position. Once that's done, though, I'm hoping to carefully record all the specs, make up a template, and then repeat the whole process about a dozen times over (hopefully streamlining it along the way) so that we'll have a nice stable of reversibly Stenofied Sidewinders available for the workshop. I'll update the blog with my progress once the skin arrives and I get the template design drawn up.

Wish me luck!

Sunday, February 26, 2012

Interactive Demo on StenoKnight Page

Regulars to the Plover Blog and Wiki might not care, but I've put an interactive demo page on my StenoKnight CART Services business website. I used it to explain how steno works in my recent Presentation for That Keith Wann Show, and I figured I might as well keep it up there for whoever might want to use it or link to it. It's basically the Plover Demo embedded in a page with some additional instructional information for people who've never encountered steno before.

Oh, and I've also added a link to the Plover Aviary on the sidebar of this blog. The Aviary has been very quiet since its inception in December, but I'm still hoping that eventually we'll build up a critical mass of steno newbies who want to talk about their learning process. Unfortunately, the board's been getting a ridiculous amount of spam -- about 20 spam posts and almost 100 spam members added per day. I've had to put all posts by new users on moderation, and I delete all new users with zero posts en masse every day or two, but if you want to join (and you're not a spammer), just write one introductory post, and as soon as it goes through I'll take you off the new users list, so that you can post unmoderated to your heart's content from that point on. Otherwise you might be in danger of getting deleted in one of my zero post pruning sessions. If you really want to lurk on the boards and don't want to post anything, just email me -- plover@ploversteno.org -- and I'll put you on the whitelist manually. As I said, the Aviary is pretty much idle these days, but as Hover Plover gets going (still no word on the grant, but once we have a conclusive yes or no we can plan our next steps) I'm hoping the place will pick up a bit.