Monday, May 28, 2012

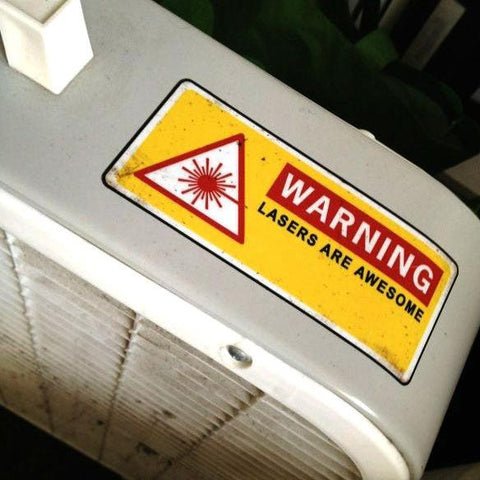
Warning: Lasers Are Awesome


The laser cut keys are here!


I spent Saturday peeling the sticky paper off of them and watching Downton Abbey. Last night I watched more Downton Abbey while sticking the keys onto one of my 10 SideWinders. Doesn't it look great? It works really well, too. In honor of the occasion, I entered a bunch of html formatting strokes into my dictionary, and I've written 100% of this blog post using it. I've got enough keys for 20 sets, though five of those are already spoken for, and 10 will be set aside for my PyGotham Plover workshop on June 8th. I'm really excited about that.

So the next week or so will involve lots of opening SideWinder boxes, peeling foam backing, and sticking on keys. I'm wondering whether I should commission some sticker sheets for the keys from InAFlashLaser, but I'm not sure. On the one hand, I feel like sticking on colored labels for each letter on the keyboard would give beginners a leg up in trying to figure out steno in three hours. On the other hand, I worry that it would make combining those letters into chords more confusing. I know that my steno teachers at school were adamant about never labeling steno machine keys, but they were wrong about so many things, it's hard to tell how much credibility to give them in this case. It might be overkill, because I've hired a freelance graphic designer to remake my functional but butt-ugly steno alphabet chart into a more elegant and aesthetically consistent form, and I'm hoping to have at least one poster to put up in the front of the room while I give the workshop. But maybe stickers plus poster are the killer combination? It's really hard to say.

After the workshop, I'm going to try to put some sort of Plover store up. We'll sell the key sets, SideWinders with keytoppers already stuck on, the steno alphabet poster, the alphabet stickers if I wind up deciding to make them, and possibly some other random merch-type swag such as coffee cups or hats or T-shirts or something. Not sure about those. Is there demand for such a thing? Any ideas you guys might have in that department is very welcome. All proceeds, of course, will go to funding store inventory and paying programmers for Plover development. This is really slick. The keys offer a huge improvement in haptic feedback, and increase my comfort, accuracy, and speed on the SideWinder by a huge extent. I think you guys are going to love 'em.

Oh, in case you're interested, here are my new entries for easy html formatting in steno:

"A/HREF": "<a href=\"{^}",
"HAOEPT": "http://{^}",
"PWRABG": "<{^}",
"PWRA*BG": "{^}>",
"EUPBG/SR-S": "<img src=\"{^}",
"PWR": "<br>",
"KHR-BG": "{#Control_L(c)}",
"KHR*F": "{#Control_L(v)}",

Monday, May 14, 2012

Plover Pedagogy!

Several exciting things to report.

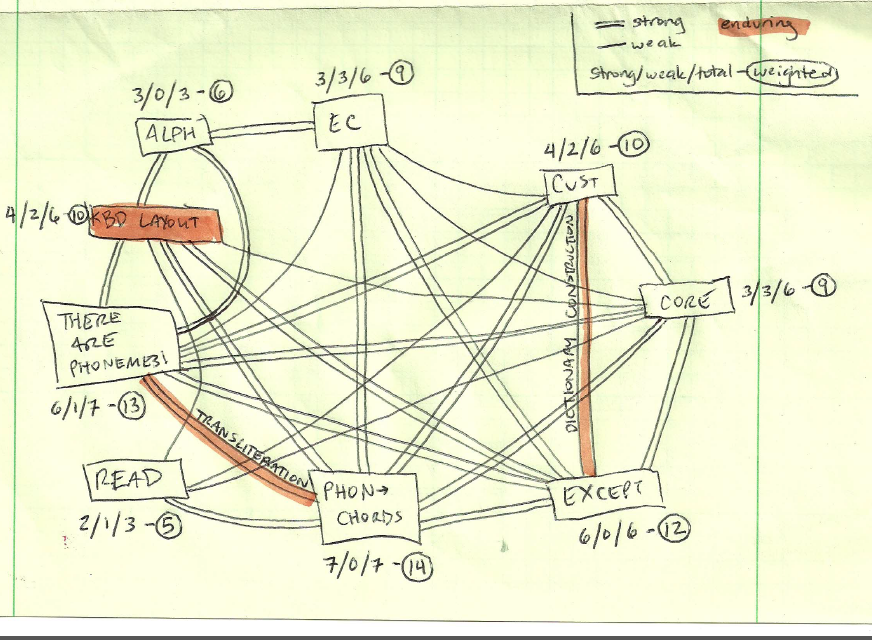
First off, I spent a marvelous afternoon with longtime Plover supporter Mel Chua (who wrote the opensource.com article that grew our community exponentially) at the end of April, and we worked out some ways to attack steno pedagogy for Plover users. She wrote a great article on what we came up with for her blog, so I'm just gonna point you there:

Network of steno concepts, interlocked with single lines for weak connections and double lines for strong connections. Starting from top and going counterclockwise: Alphabet, keyboard layout, there are phonemes, reading steno, phonemes to chords, exceptions, core dictionary, customizing dictionary, error correction. Keyboard layout, the connection between there are phonemes and phonemes to chords, and the connection between exceptions and customizing dictionary are highlighted in orange.

Applying Pedagogical Skillz to FOSS Projects: Plover Case Study


Second, I've found an even better solution to the stenification of a Sidewinder: Lasers!

I've got Mel to thank for this too; when I explained that the epoxy casting process was a little tedious because of the 24-hour curing time, she asked me if I'd looked into laser cutting. I knew about laser cutting because it's used all the time in one of the graduate design programs I CART for, but I'd mostly seen them use it on cardboard, paper, and rubber stamps; I didn't know that it was practical to use on hard plastic. But I contacted Sara Gould from In a Flash Laser (who I've known on Twitter for years; she's a CI-wearing musician, engineer, and all-around fascinating person), and she sent me a handful of laser-cut steno keys to see if they were what I was looking for. Turns out they were actually way better. They were more rigid than the epoxy, so I didn't have to worry about them accidentally bending on me, they didn't have the slightly annoying beveling, and I was able to make them a bit smaller than the molded keys, which meant I only had to affix them to the Sidewinder with one square of mounting foam instead of two. Triple bonus! Plus they're very affordable, and having them made by a professional laser-cutting company instead of me in my off time means we can always have a decent quantity in stock. I immediately sent off for 20 sets, and as soon as they arrive, I'll start assembling them. I'm only planning on having 10 assembled Sidewinders onsite at the PyGotham Plover Workshop, so I'll have 10 more sets to sell or give away to Plover code contributors.

Speaking of PyGotham and code contribution... The last exciting thing:

There's going to be a coding sprint on Plover from 6 pm to midnight on June 8th, hosted by PyGotham and several of its sponsors! There'll be free food and drinks, live music, some awesome-weird electronic art, and our own Hesky there to help with the coding. I'll be there to weigh in on the steno side, of course, and Josh might even be able to attend via IRC for at least part of the night. It's gonna be amazing.

So between now and then I'll be cleaning up the Launchpad page, adding, editing, and documenting bugs and blueprints. I've been using Plover exclusively for my transcription work over the past several weeks, so I've been able to keep a running log of stuff that still needs to be improved on as I transcribe. I even made a single stroke command for it:

"KW-RPB": "{#Escape}:split plovernotes.txt{#Return}",

When I'm in Vim, all I have to do is write KW-RPB, and my plovernotes file will come up on the top half of the screen. Then I write the mistranslated word or iteration of a particular bug, write ZZ (STKPW*P/STKPW*P), the window closes, and I'm back in my transcription file without ever lifting my hands from the keyboard. It's fabulous. So I've been building up a fine raft of bugs to squash during the coding sprint. Spread the word!

Wednesday, April 18, 2012

Where does the money go?

In the comments on the StenoKnight blog post I mentioned in the previous article, Stan asked:

"Btw, if I were to start donating money to the project, where would it go? Like does it pay programmers? For more Majestouches and Sidewinders? Epoxy? Lol."

I replied:

"As of right now, Plover's raised $4,762. I've contributed $4,000, and 15 generous donors have contributed the $762. All of that money except $100 (which we received yesterday) has so far gone to Josh Lifton, Plover's first programmer, to try to reimburse him in some small degree for the enormous number of programming hours he's donated over the past two years. Hesky made the most recent code contribution, so I offered him yesterday's $100 donation, but he said he was happy to keep contributing code for free, and told me to keep the $100. I'll be using it to buy epoxy and foam mounting squares to stenoize the Sidewinders I'll be buying (most likely out of pocket) for the PyGotham steno class. I'll probably offer the Sidewinders for sale after the class to any students who feel like pursuing steno further, and any money I make from that will go back into the general fund, either to pay for programming or to build up a starter inventory of epoxy key kits to sell, which might go some way toward making Plover somewhat self-sustaining."

I figured it was a fair question to ask, and I just wanted to put the answer out there in a more prominent place, in case other people were interested. More information on how to contribute money, code, or other resources can be found on our Donation Page.

Tuesday, April 17, 2012

Video: Plover versus $4,000 Software

Just wanted to mirror the video I posted last night over on my StenoKnight CART Blog, in an entry called CART Problem Solving: Lag.


The top frame is Plover, of course, writing into Vim. The middle frame is my $4,000 proprietary software, Eclipse, and the bottom frame is pretty much Eclipse's only concession to my profession -- it's almost exclusively focused on the needs of court reporters rather than CART providers or captioners -- a utility called the "CART Window". It eliminates the horrible syntax markup you see in the Eclipse window itself, but as you can see the trade-off for that is a 1.5-second delay between when a stroke -- including a command stroke like "Enter" or "arrow key right" -- is written and when it appears on the screen. It's incredibly annoying. I'm not singling out Eclipse for ridicule, incidentally. It's the best of the proprietary crop by a fair margin. All the other software on the market is based on this timed buffer principle. Plover is the only steno software I know of that actually delivers instant text to the screen without the tiresome intermediary of a timed buffer. The importance of this is hard to articulate to people who don't know how long 1.5 seconds can feel when they're waiting for a computer to respond to their commands or when they're relying on the text to appear before they can pick up the thread of the conversation. This is one of my all-time favorite features of Plover, but it's hard to explain the difference to people who haven't had to work with a program like Eclipse. I hope this video makes it a bit clearer.

Monday, April 16, 2012

Plover for Windows is Updated!

Fantastic news!

Hesky has updated the Windows Port of Plover. It now support commands such as Escape, Backspace, Return, et cetera. This makes it much more useful to use as a replacement key entry system. I'm planning to use it as a monitoring system when I can't see my client's screen. For instance, I have a class tonight where the student likes to sit several feet away from me at a seminar table, while I sit near the back wall. Up until now, I've had to crane my neck and squint my eyes to read the words I was writing over her shoulder. My proprietary steno machine has dual outputs, which means that it can send the same steno signal to two separate Bluetooth recipients, but my commercial steno software won't allow me to run it on two computers at the same time, so even though I always carry both my laptop and my tablet PC with me, the other computer has been basically useless to me in this situation, unless I wanted to set up a StreamText job for myself, which would cost me $6 per hour. Last week I tried using the Windows version of Plover as a monitor to cut down on the eye strain, but because commands weren't yet implemented, Plover had to be restarted every time I sent a "new paragraph" command. Restarting Plover isn't that hard; you just click the red P on the task bar twice. But it was still kind of inconvenient. Now I'll be able to monitor output on my laptop while my client views the same output on my tablet, which is going to be really nice. I know that everyone using Plover for Windows applications will really enjoy this update too. This version is based off of the penultimate Linux version, so it still doesn't have correct number handling or any of the nice added features from Josh's last version (like the on/off toggle hotkey). Hesky's hoping to get to those in a week or two. This is still a really big improvement, though. Check it out!

http://stenoknight.com/plover/plover.exe

By the way, I wrote this entire blog post in Plover on the SideWinder pictured in the previous post, with the epoxy keys. It's really amazingly smooth and comfortable, and both my speed and accuracy are drastically improved over the non-altered SideWinder. I'm very pleased. I'll be ordering more SideWinders and making more epoxy keys over the next few weeks, and hopefully I'll have built up a decent-sized stable of them by the time PyGotham arrives, so that we'll be able to accommodate anyone who wants to learn steno hands-on.

Tuesday, April 10, 2012

Epoxy Keytopper Update


As you can see, I've been iterating the epoxy keytopper experiment, and I'm quite pleased with the progress we've had so far. I got some opaque resin dye to make the keys a bit more attractive. They're sort of a smoky gray color in this batch; I think I'll use more dye in the next batch to see if I can make them truly black. This batch of keys is also thicker and stiffer for some reason, whether because I didn't use enough hardener in my first batch (I sort of approximated the one-to-one ratio) or because I made sure to fill the wells all the way up to the top. I think it's an improvement, because while the keys are harder to cut down to size using scissors, they also don't flex and buckle the way the first batch did, making the overall feel a much more secure one. Because I didn't cut the keys down, though, I had to lift them up so their overlapping edges didn't accidentally press the keys in the row beneath them. I bought a couple of packets of foam mounting squares (usually used for scrapbooking) and stuck 'em on, two squares per key. It works fairly well, though as you can see my rows are not quite even, and there's precious little wiggle room between certain of the keys. I'll definitely have to come up with a more consistent method of sticking these things on. It's still too haphazard and time-consuming. Plus the adhesive on the mounting squares is definitely too weak to stand up to repeated off-center pressure from pressing on these keys. I think to be truly effective we'll probably have to put a small glob of superglue between each of the four layers. I think the company that was supposedly selling the silicone Sidewinder skin ripped me off; they charged my Paypal account, but I haven't seen any sign of the skin, and they're not answering my emails. ETA: They emailed me a day after I posted this, saying the skin was on back order. So hopefully it'll arrive eventually. Oh well. As you can see from the picture, I had to take the space bar off the machine because otherwise the vowel keys would hit it when they were pressed. (That unearthly red glow is made by the LED backlighting of the Sidewinder. I think I might cover the gap where the space bar used to be with black gaffer's tape, just 'cause it's a little creepy-looking.) So I think this method is going to require permanent conversion of Sidewinder into steno machine, which makes me less reluctant to use superglue. I'm happy to report that the feel is already drastically better -- the full-sized, uncut keys are much easier to work with, and the foam gives them a bit of a lift that's also pretty comfortable. I wrote a paragraph or two with Plover on this keyboard and it was drastically better than the first prototype I posted, which itself was quite a bit better than the undoctored keyboard. So I'm hopeful that this will be a good starter machine for the stenocurious at PyGotham, and if I can work out a reliable templating system (any ideas on that are very welcome!) in terms of how to position the keys easily and consistently, I think this would make a nice little kit that we could sell at a modest profit to benefit the Plover Project. The only real bottleneck is the 24-hour curing window between batches, since I still only have the one mold, but that's really not so bad. I think I'm on the right track.

Guest Post: Getting Started with Steno

This is an article written by Mau Bustamante, a steno autodidact who showed up on the Aviary a few months ago, to my great delight. He posted this over there a while ago, but I've been swamped, so I'm just now mirroring it here. It's really cool to see that the expensive steno school paradigm is not the only effective one out there. I knew that already when Stan Sakai picked up Plover on a whim, taught himself theory from a book, and and wound up eventually buying commercial steno software and hardware and becoming a professional CART provider. He's promised to write me a recap post on his learning experience too, but in the mean time, I'm really happy that we've got Mau's account, because he's much more the sort of audience Plover is aiming at. He doesn't intend to make steno his career, but he's happily using it in his daily work and recreational life, which makes me ridiculously excited. It's so cool seeing that it's already useful technology, even though Plover's still got a way to go (I'm still trying to get someone to finish up the Windows port, and I've got to do some tasks for Fly in order for Pragma to be able to finish the next version. Still no word on the dictionary conversion script. Josh says he's going to be working on the just-in-time dictionary entry feature soon, but he's got to get a break from his day job first. Open source development is like a glacier: Slow but relentless, and eventually unstoppable.) So enjoy Mau's post! If you've got any comments or questions, feel free to ask them here and I'll forward them along, or head over to the Aviary and ask him directly!

Getting started with steno - my experience
Mau Bustamante

Intro

I took up the Dvorak keyboard some five or six years ago and find it to be much more comfortable and enjoyable to use, though not necessarily any faster. Around the time I started reading about alternative keyboard layouts, I found out about the machines that court stenographers use to transcribe proceedings. However, the high cost of the hardware required to use this technology and the inability to type directly to the computer meant that it was out of the question for me. Some years later, I discovered Plover and tried out the in-browser demo.

Having the opportunity to try out this method of entry with a total investment of a nice gaming keyboard meant an immediate download and a new obsession.

The following narrative summarizes my learning process/approach to stenography right from day 1. It is provided for informative purposes; it is not the official method, or even a good method necessarily, and therefore it is not guaranteed to work for anyone. Read at your own risk.

The beginning

After reading some of the most recent Plover blog posts [1], I jumped straight into the learning phase. My initial approach was the same as what I used to learn Dvorak. I studied the key layout to understand how my hands are supposed to hit the keys. Keeping a picture of the lay out open in another window or writing it down for reference helps a lot to learn the location of the letters [2]. I typed the whole alphabet a few times before moving on [3]. The phonetic makeup of the chording system did take a little to get used to, but once you can wrap your head around this element, the rest kinda falls into place a lot faster.

I read all of the tutorials available [4]. The next step was to try out all the sample sentences and words that I could find. There are common sentences listed on the aviary and the wiki [5]. I tried to make mental notes on how the briefs are put together - most of them have some phonetic logic that is easy to remember...some of them don't at all, but that's just something that you have to deal with and since English is stupid like that too, I didn't mind all that much.

While I began to learn to put together the sounds, I took note of the fact that some keys used on their own represent endings such as "s" or "ing" - this is very useful because it is often possible to attach those endings at the same time as the rest of the word. I spent considerable time trying out all the endings [6]. In the same way that I learned the layout, I'd keep a notepad window open for typing on one side of the screen and the endings list on the other for ease of reference.

Intermission

I'd like to mention here that learning steno is not something that I restricted to my time on the computer. Learning steno is a day-long exercise... From time to time, I'll catch myself wondering how I can type a certain word or I'll try to follow along with the radio or television by tapping on a desk or something. It gets into your head kinda like the falling Tetris blocks that stay on your mind when you're trying to sleep after playing for two hours.

The continuation

Letters and sample sentences are all good and nice, but after a while, I felt like I should be typing other words that are not part of the lists. I faced three options: I could finger-spell everything, I could spell words phonetically, or I could learn the briefs.

I quickly found out that finger-spelling everything takes just about forever. Speed-wise, stroke for stroke, briefs are the clear winner, but I noticed that it takes a lot of time and mental effort to learn them well enough to recall with any sort of reliability.

With this in mind, I decided to work mostly on getting the hang of producing the individual sounds to build the words from their parts. Briefs moved to the bottom of my priority list. At this stage, I was beginning to get really excited about my progress. Speed was not very good, but it was satisfying to be able to guess how to type the words just by figuring out the component sounds. For those trickier words, I had to dig through the dictionary to find the right way of typing it. Knowing no good way to navigate the dictionary, I decided to harness the power of Microsoft Excel [Appendix A]. This worked out very well because I was able to type an entire sentence at once instead of having to look for the words individually. I've found that there are numerous entries in the default dictionary that are a result of stacking errors or misspellings so be careful about what definition you decide to adopt. Unfortunately, I don't have the experience to identify the best definitions to use with any real confidence. I just stick to one that makes sense in my mind and is comfortable to type. Making sense of the definitions you use is key to being able to recall them quickly. When I switched to Ubuntu, I started to use the grep command on the dictionary file, which meant going back to finding individual words. [Appendix B]

Next steps (wingflaps?)

At this point, I'm fairly satisfied with my progress. I'm able to do most of the operations that I normally do on the computer with Plover, but there are still some rough edges and aspects of it that keep me from switching completely. For instance, it would be great if the number pad or the numbers above the letters were usable. This way, I could use Excel without having to turn Plover off simply because steno in my opinion is just not suited for entering calculations such as 13557/4132*(546-45) efficiently.

[1] http://plover.stenoknight.com/
[2]http://stenoknight.com/plover/qwertytosteno.png
[3]http://stenoknight.com/stengrid.png
[4]http://plover.stenoknight.com/2010/06/steno-101-how-to-do-it.html
[5]http://stenoknight.com/wiki/Practice_Sentences_with_Common_English_Words
[6]http://stenoknight.com/wiki/Plover_Cheat_Sheet


The appendices are available here
http://www.eng.uwaterloo.ca/~mbustama/apps.doc
And my lookup file
http://www.eng.uwaterloo.ca/~mbustama/lookup.xlsx